Making Images Accessible
Purpose
What is online course accessibility?
Online course accessibility is the ongoing process of helping you ensure that members of the disabled community are able to gain access to the same information or content as non-disabled individuals. Making online course content accessible is a matter of incorporating basic accessibility features into the overall design process. As a content creator and curator, you need to be aware of online course accessibility issues.
Why should I do this?
Making your course content accessible allows individuals with disabilities to browse your content. Such disabilities include motor, visual, auditory, cognitive deficits and seizure disorders. Making your content accessible allows this segment of the population to access information on par with non-disabled individuals. This isn't just a best practice in education, it's mandated by law.
The law states:
A text equivalent for every non-text element shall be provided (e.g., via "alt", "longdesc", or in element content).
Screen reader software can only convey information in a text format. This means that you must provide text alternatives for all non-text elements. This tutorial will focus mainly on images, since they are the most common type of non-text elements.
As an online course developer, what should be my focus?
Regardless of whether you're developing your own course or serving on a team of developers, it's essential that you, as the content area expert, carefully select accessible instructional materials (such as videos that include accurate captions) and also make the instructional materials that you select accessible (such as writing appropriate alternative text for images).
If you are the Development Facilitator on a standard online course development team:
Review the following information, paying attention to the guidelines for writing alternative text descriptions for non-text elements. You will not need to know the technical details, as you will only need to provide the alternative text descriptions to the Instructional Design Specialist on your standard online course development team, and they will worry about the technical details.
If you are a solo developer of an online course:
Review the following information, paying attention to both the guidelines for writing alternative text descriptions for non-text elements, in addition to the practical strategies for integrating these into your materials.
What is Alternative Text?
The law states:
"A text equivalent for every non-text element shall be provided (e.g., via "alt", "longdesc", or in element content)."
Screen reader software can only convey information in a text format. This means that you must provide text alternatives for all non-text elements. This tutorial will focus mainly on images, since they are the most common type of non-text elements.
There are two ways to provide text alternatives for images:
1. Alternate text (alt attribute)
Use the alt attribute to give an image a short description.
- Try to keep alternate text as short as possible while still conveying the meaning of the image. The
altattribute does not inherently have a size limit, but a good rule of thumb is 50 characters or less. - Images that do not have meaning, such as decorative images or transparent images used for spacing, should have empty alternate text (
alt=""). Use your best judgment when deciding whether an image has an important meaning or not. - Never omit the
altattribute for any image.
2. Long descriptions (longdesc attribute)
Use the longdesc attribute to provide a long description of an image.
- When alternate text is not sufficient, the
longdescattribute provides a link to another web page with a more detailed description of the image. - Normally, only screen readers can see and navigate to this link.
- The web page containing the long description should be text only and as simple as possible.
A Note about the title attribute
Additional information about the image can be provided using the title attribute. The title attribute should not be used exclusively for providing alternative text.
Let's Look at a Few Examples
The following examples illustrate how alternate text and long descriptions should be used for different instances of images. After you have added alternate text and long descriptions (where appropriate) for all your images, you can verify the correctness in a web browser by pressing F12.
Basic Images
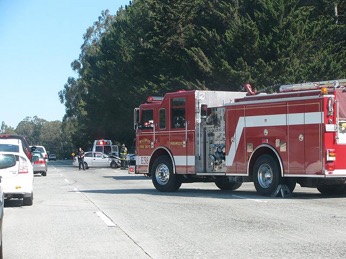
If the image is a drawing or a photographic picture, make sure that the alternate text adequately describes the content of the picture in 50 characters or less. If the image requires more than 50 characters, write a short alt text and add on a longdesc attribute, which is explained in the Complicated Images section below.

<img src="/content/enforced/90100-OFR_Developing_an_Online_Course_2016Feb/Instructional Materials/Image2A.jpg" alt="View from the perspective of an approaching motorist of a highway accident scene where a firetruck blocks the right lane and traffic flows in the left lane" title="" />
Text Images (non-linked)
If the image is not linked and contains text, make the alternate text correspond to the image's text. For example, the alternate text for the image below is "Workforce Institute St. Petersburg College" Don't add additional text to the description such as "photo", "logo", "image", "picture", etc.

<img src="/content/enforced/90100-OFR_Developing_an_Online_Course_2016Feb/Instructional Materials/logo-workforce.jpeg" alt="Workforce Institute St. Petersburg College" title="" />
Linked Images
If the image is linked, describe the image using alt text and describe where the link is taking the user using the title attribute. The screen reader tells users that the image is a link, so mentioning "link" in either description is redundant.

<a href="/content/enforced/90100-OFR_Developing_an_Online_Course_2016Feb/Instructional Materials/" target="_blank"> <img src="/content/enforced/90100-OFR_Developing_an_Online_Course_2016Feb/Instructional Materials/logo-workforce.jpeg" alt="Workforce Institute St. Petersburg College" title="Go to St. Petersburg College Workforce Institute website" /> </a>
If the linked image does not have any text in the image, the alt text attribute should describe the image and the title attribute should describe where the link takes the user.
Decorative Images
Decorative images have no added meaning to the web page, so their alternate text should be empty. To make alternate text empty, type two double quotes with nothing in between (alt=""). Spacer images, images that help with formatting, and background images are good examples of images that should have empty alternate text. You should never completely omit the alt attribute for any image.

<img src="/content/enforced/90100-OFR_Developing_an_Online_Course_2016Feb/Instructional Materials/Large-wave-divider.png" alt="" title="" />
Complex Images
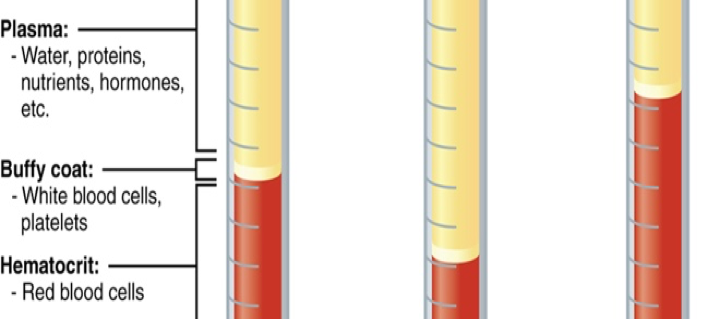
Use the longdesc attribute for images with complex content, such as charts, paintings, maps, organizational charts, diagrams, etc.). Alternate text is designed to be quick and short, while long descriptions provide an in-depth description of an image. You still need to use the alt attribute if you decide to use the longdesc attribute. This way, your users can decide whether they want to skip or hear the long description based on the alternate text.
The longdesc attribute provides a link to another web page with a complete description of the image content. The long description web page should be text only and as simple as possible. Sighted users will not see the link on the page, but a screen reader can navigate to the long description if the user decides to do so. The long description page opens in a new browser window.
As an alternative to using the longdesc, the image can be described in detail on the web page that contains the image. This is considered a best practice because the information is available to all users.

View blood vial diagram description
<img src="/content/enforced/90100-OFR_Developing_an_Online_Course_2016Feb/Instructional Materials/Image3A.jpg" alt="blood vial composition diagram" title="" longdesc="Description+of+blood+vial+diagram.html" /> <br /> <a href="/content/enforced/90100-OFR_Developing_an_Online_Course_2016Feb/Instructional Materials/Description+of+blood+vial+diagram.html" target="_blank"> View blood vial diagram description </a>
The Description+of+blood+vial+diagram.html file should contain text similar to the following:
The diagram shows a portion of a blood vial, containing three distinct layers.
The top layer, colored yellow, occupies the top half of the vial, and is Plasma, containing water, protein, nutrients, hormones, etc..
The second layer down is a narrow, white-colored layer occupying only a very small portion of the vial in the vertical center, is called the Buffy coat, and contains white blood cells and platelets.
The third layer is colored red, occupies the bottom half the vial, and is Hematocrit, containing red blood cells.
Making Images Inside Documents & Slideshows Accessible
In many cases, you will use files or documents in your online course that contain images. Similar to images on the web, the images in your Word documents, Powerpoint slideshows, PDF documents, and other types of files must be accessible to all learners with alternative text.
The following techniques will help you create accessible files or add accessible alternative text to your existing files.
- Making Powerpoint slideshows accessible (Penn State University)
- Making Powerpoint slideshows accessible (WebAIM)
- Making Word documents accessible (Penn State University)
- Making Word documents accessible (WebAIM)
- Making PDF documents accessible (Penn State University)
- Making PDF documents accessible (WebAIM)
Screen Reader Simulation
If you have never used a screen reader software, an application designed for people with visual impairments, you may wish to view the following video where a person with a visual impairment demonstrates how she uses the JAWS screen reader software on her computer to browse the internet.
Next Step
After carefully exploring the information and examples above, proceed to the next topic in this submodule, in which you will learn strategies for choosing accessible video materials.
This page is adapted from the work Alternative Text by the Utah State University Center for Persons with Disabilities at http://webaim.org/techniques/alttext/ ©WebAIM
- Utah State University Center for Persons with Disabilities. (2015, September 3). Alternative Text, WebAIM. Retrieved from http://webaim.org/techniques/alttext/